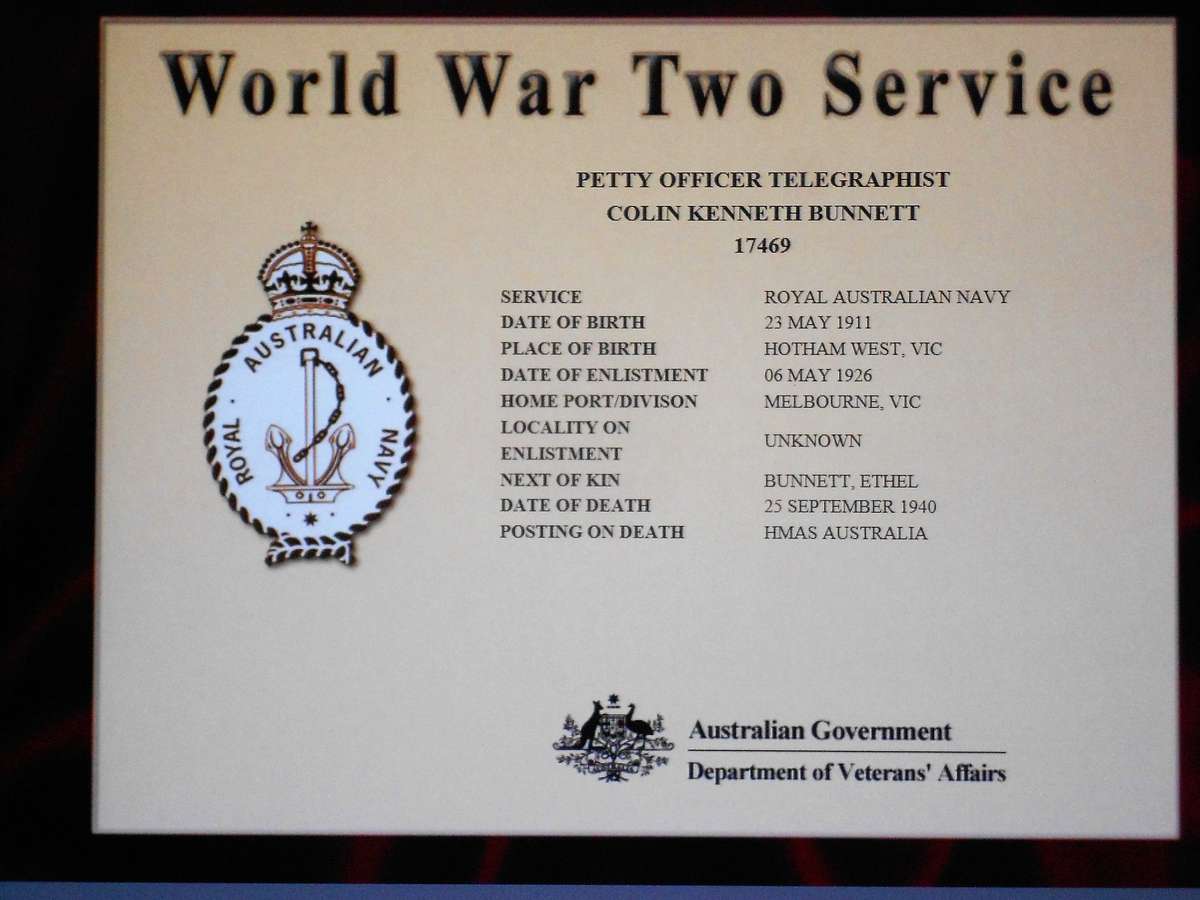
Colin Kenneth Bunnett was born at Hotham West on 23 May 1911, the son of Herbert and Deborah Bunnett. After leaving Melbourne High School at the age of 14 he entered the Royal Australian Navy on 06 May 1926 at Melbourne, and posted to HMAS Tingira as a Boy 2nd class.
HMAS Tingira (the former sailing ship Sobraon) was moored permanently on Sydney Harbour at Rose Bay, and had been converted to a training school for boys, between 14½ and 16. On Tingira Boys received comprehensive instruction in seamanship with the opportunity to develop specialist skills. On 01 December 1926 Bunnett was promoted to Boy 1st Class (Telegraphist) and was posted to HMAS Cerberus (Flinders Naval Depot (FND)) on 12 May 1927 for further training, with his ability assessed as ‘superior’.
Bunnett’s next move was on 08 June 1928, to the ship and submarine tender HMAS Platypus (1) as a Boy Telegraphist; sailing in local waters with promotion to Ordinary Telegraphist 2nd Class in August 1928. The next posting was on 16 December 1928 to the cruiser HMAS Brisbane (1), then on 23 January to the newly commissioned seaplane carrier HMAS Albatross (1). On 23 March he was rated Ordinary Telegraphist 1st Class. Albatross would have played an important part in developing Bunnett’s interest in naval aviation, as the ship’s Seagull 111 amphibians had a crew of three one of which was a Telegraphist – with frequent flying as the ship cruised extensively in Australian waters and the Mandated Islands to the north. His Albatross draft ended on 31 October 1930.
The next posting was a return to HMAS Cerberus, FND, Western Port Bay, arriving on 01 November 1930 where he was stationed for several years. As FND was the major RAN training depot, he would have received additional instruction. Between 29 April 1931 and 23 April 1933 Bunnett was again drafted to the seaplane carrier HMAS Albatross (1) where he became involved in flying duties, qualifying as a Telegraphist Air Gunner in 1931. For the period 22 April 1933 to 05 August 1933 he was back at HMAS Cerberus, FND, possibly to brush-up on the latest wireless and signalling techniques before his next posting at sea.
On 13 September 1933 Bunnett was shipped to London to join the ‘W Class’ destroyer HMAS Vendetta (1), one of four similar destroyers on loan from the British Admiralty, commissioned into the RAN at Portsmouth on 11 October 1933. They formed the Australian Destroyer Flotilla – famously known as the ‘Scrap Iron Flotilla’. On 17 October 1933 HMAS Vendetta sailed to Australia via Suez, Singapore and Darwin arriving at Sydney Harbour on 21 December 1933.
As Vendetta was then paid off into reserve, Bunnett returned to HMAS Cerberus, arriving on 01 February 1934, where he remained until 08 April 1935. He continued to be assessed as ‘superior’ which would have been a factor in his selection for transfer to HMAS Harman at Canberra. The radio station at Harman was the RAN’s main wireless communication centre, and the site for the new Belconnen Naval Transmitting Station. At the time it was the most powerful wireless base in the British Empire, and largest naval and commercial station in the southern hemisphere.
The visit to Harman would have been a short-term familiarisation, as his next posting on 11 April 1935 was to the survey vessel HMAS Moresby (1) – the same day Moresby was recommissioned. Moresby’s first task was an urgent survey near Wilson’s Promontory, then deploying to Darwin for hydrographic work, followed by surveying in North Queensland waters. Bunnett’s time on Moresby ended on 22 March 1937. He then moved to the heavy cruiser HMAS Australia, where he resume his Telegraphist Air Gunner duties, flying in the new Seagull V amphibians. While serving on Australia Bunnett was promoted to Acting Leading Telegraphist on 01 July 1938. His annual assessment on 31 December 1938 is noted with an RR (red-ink recommend) an indication Bunnett’s performance was well above average.
A promotion in the navy is quickly follow by a new posting; this time Bunnett returned to HMAS Cerberus as a Leading Hand (a Kellick in navy terms, like a Corporal in the Army or Air Force). There is no indication of his duties at Cerberus, but likely for additional specialist W/T and communication training; due to rapid advances in radio technology which played an important role in the navy signalling and communications. On 06 May he was posted to HMAS Penguin again for more specialist training returning to Cerberus on 14 July 1939.
Although a date is not available by this time Bunnett had married his sweetheart Ethel Charlton [it is uncertain if Charlton is a middle name or her nee] and that a baby had arrived. His next of kin address is given as Fletcher Street, Bondi, a Sydney suburb.

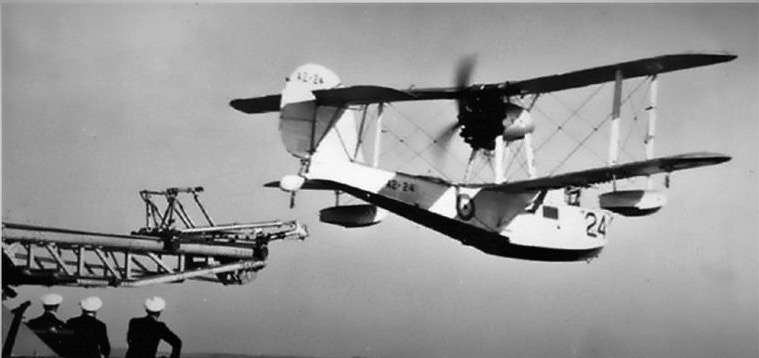 Above: [1] Report of Bunnett’s death in the Australian of 12 October 1940 (courtesy Trove), which erroneously reported only two fatalities (the pilot, FltLt Clarke also lost his life). [2] A Walrus amphibian, similar to the aircraft Bunnett would have flown in many times.
On 28 August 1938 HMAS Australia was re-commissioned at Sydney. Two days later Leading Telegraphist Bunnett was posted to HMAS Australia (confirmed as a Leading W/T on 01 July 1939). On board he was issued with a flying helmet and resumed his Telegraphist Air Gunner duties. This involved flying in the ship’s Seagull V amphibian, being catapulted from the ship and on completion of the mission the aircraft would alight on the water and taxi to the ship’s side, to be hoisted onto the catapult platform. [Bunnett would do ship’s W/T duties when not flying.]
The role for the Seagull V included reconnaissance, reporting fall of shot during bombardments, searching for enemy ships and submarines, and attacking land and sea targets with bombs and machine guns where necessary. Bunnett’s work was to act as the aircraft’s W/T operator, and assist the Pilot and Observer to identify targets or objects of interest, and as necessary to fire the Lewis or Vickers K guns.
On 03 September 1939 WW2 was declared. HMAS Australia was patrolling the Australian coast, but from May until July 1940 she began convoy escort duties between Fremantle and Cape Town, with her Seagull V used as a lookout for armed German raiders. Australia then moved to the west coast of Africa as part of the Dakar Squadron which was monitoring the Vichy French fleet operating in the region. During this period Bunnett would have been making regular patrol flights in Australia’s Seagull V searching for enemy ships and submarines. In August 1940 Australia accompanied a convoy to the UK where the ship’s Seagull A2-24 was sent to Saunders Roe factory for overhaul and modifications, receiving Walrus L2247 as a replacement (the Walrus was a later version of the Seagull V), which was embarked for the return journey to Dakar. On 01 September 1940 Bunnett was promoted to Acting Petty Officer Telegraphist.
During September 1940 HMAS Australia took part in ‘Operation Menace,’ the aim being to assist General de Gaulle to land Free French forces in West Africa, where the Vichy French government were installed, and Dakar was used as the base for Vichy French warships, submarines, and armed merchant raiders. De Gaulle believed he could persuade the Vichy French to join the Free French without bloodshed. Also, to avoid the French cruisers and the battleship Richelieu falling into German hands.
The belief that Dakar would welcome de Gaulle was optimistic and ill-founded with the Vichy French shore batteries opening fire on the British Fleet and RN ships being hit; with the Vichy governor refusing to negotiate. On 24 September HMAS Australia was engaged in a general bombardment of the Vichy naval fleet and shore batteries at Dakar, with Australia subject to near-miss bombing by Vichy twin-engine Glenn Martin bombers. On 25 September Australia and HMS Devonport were ordered to fire on Vichy warships and shore batteries at Dakar harbour.
During this engagement HMAS Australia was hit aft twice and her Walrus aircraft which was in the air, calling fall of shot, was attacked by Vichy French Curtiss Hawk 75A fighters, and was seen to crash into the sea. A brief description of the incident was reported by Australia’s Captain Stewart stating that: ‘At 0917 a Walrus aircraft was observed to have been shot down astern of HMS Barham. Two of the crew were seen to have bailed out. It is with deep regret that I subsequently confirmed that it was my spotting aircraft.’ What is not mentioned is that all three crew members were killed – Lieutenant Commander (O) Francis Fogarty RAN, Flight Lieutenant (P) George John Isaiah Clarke RAAF, and Petty Officer Telegraphist Colin Kenneth Bunnett RAN,
The naval records for Petty Officer Bunnett and Lieutenant Commander Fogarty record them as ‘missing as a result of enemy action.’ From this it is presumed that their bodies were not recovered. A private letter written well after the war by Alan Robinson RNVR casts new light on the incident (as related to him) saying: ‘Australia’s Walrus was observing the fall of shot of Australia’s shells when it was shot down by a French fighter. All three occupants managed to escape by parachute and land safely in the sea. Alas, a salvo from Richelieu exploded near them and so far, as I was able to ascertain at the time, it killed all three.’
A relative of George Clarke, the third crew member killed, sent the FAAAA an excerpt from a diary of his shipmate which offers a slightly different perspective: ‘George had been catapulted into the air but was only airborne for twenty minutes before he was shot down. The two men who bailed out of the plane, LtCdr W. Fogarty and PO/Tel C. Burnett were last seen making very strongly for shore but the water was almost alive with sharks. We know they died but it would be kinder to believe, hopefully, that it was a bombardment that killed them. A destroyer had been sent to pick them up but was ordered back in line as the forts opened fire on them.’
Memorials
Colin Kenneth Bunnett’s name is engraved on the Plymouth Naval Memorial, Devon, UK. The memorial bears the names of sailors who died at sea and have no known grave.
On the AWM Roll of Honour. Colin Kenneth Bunnett’s name is located in panel 1 in the Commemorative Area, at the Australian War Memorial, Canberra.
References:
National Archives of Australia: Series A6770, Control symbol Bunnett C. K., Barcode 4403283.
Extract from letter by Alan Robinson RNVR (Ret’d).
RAN Sea Power Centre: History of HMAS Australia (11)
AWM Reports of Proceedings HMA Ships
Plymouth Naval Memorial
ADF Serials